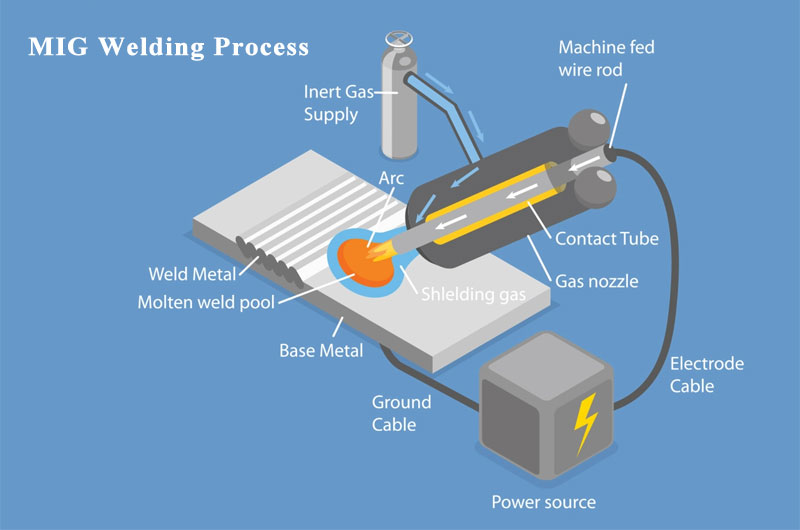
Metal Inert Gas (MIG) welding is one of the most popular and versatile welding methods used across industries. MIG welding is ideal for both beginners and professionals due to its ease of use, fast operation, and versatility in joining a wide range of metals.
This article breaks down the MIG welding process into clear, actionable steps, from preparation to finishing touches.
1. Safety First
Before you strike an arc, ensure a safe working environment:
- Protective Gear
- Helmet with Auto-Darkening Lens: Protects eyes from intense light and infrared/UV radiation.
- Gloves and Jacket: Flame-resistant leather gloves and a welding jacket safeguard against sparks and heat.
- Respiratory Protection: Always wear a respirator or ensure adequate ventilation to protect yourself from harmful welding fumes.
- Eye Protection for Bystanders: Warn or shield others nearby to prevent “arc eye” injuries.
- Work Area Setup
- Clear flammable materials.
- Ensure a dry environment; moisture can cause electric shock.
- Ground the welding table firmly.
2. Material and Joint Preparation
Clean, properly prepared materials yield stronger, defect-free welds.
- Surface Cleaning
- Clean the work surface by removing paint, rust, oil, and grease using a wire brush or grinder.
- Clean with a degreasing solvent if necessary.
- Edge Preparation
- For thicker materials (> ⅛″), bevel edges to create a V-groove, ensuring full penetration.
- For thinner materials (< ⅛″), a square-butt joint often suffices.
- Fit-Up and Clamping
- Align parts with minimal gap (around 1/16″ to 1/8″ for steel).
- Use clamps or magnets to maintain alignment and prevent warping.
3. Selecting Equipment and Consumables
Choosing the right wire, gas, and machine settings is crucial.
- Welding Machine
- Power Source: Constant voltage (CV) machine is standard for MIG.
- Polarity: DCEP (Direct Current Electrode Positive) for most steel wire.
- Filler Wire
- Material: Match the base metal—ER70S-6 for mild steel, ER308L for stainless steel, etc.
- Diameter:
- 0.023″–0.030″ for thin sheet metal
- 0.035″–0.045″ for general fabrication
- 0.052″ for heavy-duty work
- Shielding Gas
- 100% Argon for non-ferrous metals like aluminum.
- 75% Argon / 25% CO₂ (commonly “C25”) for mild steel—good balance of arc stability and penetration.
- 100% CO₂ for deep penetration, though arc is less smooth.
- Machine Settings
- Voltage: Consult manufacturer’s chart based on wire diameter and material thickness.
- Wire Feed Speed: Controls amperage; higher speed → higher heat → deeper penetration.
- Inductance (if available): Fine-tunes arc stability; higher inductance softens the arc.
4. Setting Up the Machine
- Install the Filler Wire
- Feed wire through the drive rolls—ensure proper groove type (V-groove for soft wire).
- Tension the drive rolls so the wire feeds smoothly without slipping.
- Connect Gas Hose
- Attach to regulator and cylinder; check O-rings and fittings.
- Open cylinder slowly, adjust regulator to desired flow (20–25 CFH for a typical weld).
- Ground Clamp
- Securely clamp as close as possible to the weld joint on clean metal.
- Test Arc
- On scrap metal of similar thickness, strike a test bead.
- Fine-tune the voltage and wire feed settings to produce a steady, smooth arc with minimal spatter.
5. Welding Technique
Mastering hand movements and gun angles is essential for quality welds.
- Gun Angle and Travel Speed
- Travel Angle: Hold the gun roughly 10–15° off perpendicular, tilted in the direction of travel (push technique).
- Work Angle: For fillet welds, maintain a 45° angle to both surfaces.
- Travel Speed: Steady speed prevents undercutting (too fast) or excessive buildup (too slow).
- Arc Length
- Keep the tip of the wire about ¼″ from the workpiece.
- Too long → more spatter and poor penetration; too short → risk of sticking.
- Weave Patterns
- Stringer Bead: Straight ahead with minimal side-to-side motion—ideal for single-pass welds.
- Weave Bead: Side-to-side for wider joints or thicker materials; maintain consistent width and penetration.
- Gun Travel Direction
- Pushing (angle forward): Produces a flatter bead with less penetration—good for thin materials.
- Pulling (angle back): Deeper penetration but slightly more spatter—used for thicker sections.
6. Multi-Pass Welding (for Thick Materials)
- Root Pass
- Ensure full penetration at the joint root with a slight pull angle.
- Fill Passes
- Build up the weld in layers, using stringer beads to avoid entrapment of slag or gas pockets.
- Cap Pass
- Final pass to achieve smooth, rounded appearance.
- Slight weaving can help blend transition to the base metal.
7. Post-Weld Cleanup and Inspection
- Slag and Spatter Removal
- Brush with a wire brush or use a chipping hammer if necessary (more common in flux-cored MIG).
- Visual Inspection
- Look for uniform bead appearance, proper fusion at edges, and absence of cracks or porosity.
- Non-Destructive Testing (Optional)
- Dye penetrant or ultrasonic testing for critical welds in structural applications.
- Grinding and Finishing
- Grind excessive reinforcement for flush finish.
- Apply protective coatings or paint to prevent corrosion.