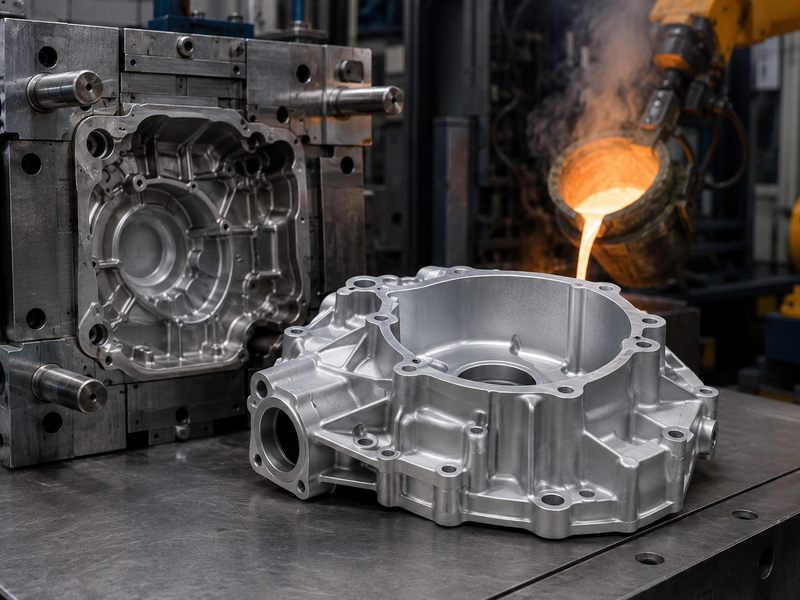
Surface finish is an important quality factor in die casting because it improves appearance, reduces secondary processing, supports painting or plating, and adds value to the final part.
Because molten metal is injected into a steel mold under high pressure, casting can create smooth, detailed surfaces. However, defects may occur if material, mold design, process settings, die temperature, release agent, or post-processing is not well controlled.
Improving surface finish requires a complete approach, from product and mold design to alloy selection, die maintenance, process control, and finishing treatment.
What Is Surface Finish in Die Casting?
Surface finish refers to the texture, smoothness, appearance, and quality of the external surface of a die-cast part. It can be measured by roughness values such as Ra, but it is also judged visually by defects such as scratches, flow marks, cold shuts, blisters, stains, dents, and porosity.
A good die-cast surface should be:
- Smooth and uniform
- Free from major flow marks
- Free from cracks and cold shuts
- Free from heavy porosity or pinholes
- Suitable for painting, powder coating, plating, or polishing
- Consistent from batch to batch
Different products require different surface standards. For example, an internal machine bracket may only need basic surface quality, while an automotive decorative part or electronic housing may require a much smoother and more attractive finish.
Common Surface Defects in Die Casting
Before improving surface finish, it is important to understand common surface defects and their causes.
| Surface Defect | Appearance | Common Cause |
| Flow marks | Wavy or streak-like surface lines | Low metal temperature, poor flow, poor gate design |
| Cold shuts | Visible lines or cracks where metal flows meet | Low temperature, slow filling, poor venting |
| Blisters | Raised bubbles on the surface | Trapped gas, moisture, heat treatment issues |
| Surface porosity | Small holes or pinholes | Gas entrapment, poor venting, contaminated metal |
| Soldering marks | Rough or stuck metal areas | High die temperature, poor release agent, alloy reaction |
| Scratches | Linear damage on the surface | Ejection, handling, trimming, or transportation |
| Die marks | Repeated marks from mold surface | Mold wear, poor polishing, damaged die cavity |
| Flash | Thin extra metal on edges | Excessive pressure, die wear, poor clamping |
Problems with surface finish are generally the result of multiple contributing factors. As an illustration, inadequate venting can lead to the occurrence of flow marks as well as porosity. High die temperature may cause soldering, rough surface, and die wear.
Choose the Right Die Casting Alloy
The choice of alloy has a direct effect on surface finish. Different metals have different flowability, shrinkage behavior, oxidation tendency, and finishing performance.
Aluminium alloys are frequently used because of their advantageous tensile properties, light weight, and corrosion resistance. However, some aluminum alloys may show porosity or surface defects if process control is poor. Zinc alloys usually provide excellent surface finish and are suitable for decorative parts, thin-wall parts, and plated components. Magnesium alloys are lightweight but require careful oxidation and safety control. Copper alloys are strong and conductive, but they are more difficult to cast because of higher melting temperatures.
| Alloy Type | Surface Finish Performance | Common Applications |
| Zinc alloy | Excellent surface detail and smooth finish | Decorative parts, hardware, electronics |
| Aluminum alloy | Good finish with proper process control | Automotive, machinery, housings |
| Magnesium alloy | Good finish but requires careful control | Lightweight electronics, automotive parts |
| Copper alloy | More difficult, but strong and durable | Electrical parts, rotors, industrial components |
For parts that require plating or decorative appearance, zinc die casting is often preferred. For structural or lightweight parts, aluminum die casting is more common. The best alloy should be selected based on strength, weight, corrosion resistance, finishing requirements, and cost.
Improve Mold Surface Quality
The mold surface directly affects the casting surface. If the mold cavity is rough, worn, scratched, or damaged, these defects can be transferred to the casting. Therefore, mold polishing and maintenance are very important for surface finish improvement.
A well-polished mold cavity helps molten metal flow more smoothly and reduces surface defects. However, polishing should be done carefully. Over-polishing can change dimensions, damage fine details, or create uneven surfaces.
Mold Surface Improvement Methods
- Polish the mold cavity before production
- Repair scratches, dents, and erosion marks
- Apply proper mold coating or surface treatment
- Maintain parting lines and sealing surfaces
- Clean vents and overflow areas regularly
- Inspect high-wear areas after each production cycle
- Use better die steel for high-volume production
For parts with high cosmetic requirements, the mold should be designed and manufactured with a defined surface standard from the beginning. It is much harder to improve the surface after mass production has already started.
Optimize Gate and Runner Design
Gate and runner design controls how molten metal enters the mold cavity. A smooth and balanced metal flow will improve the surface finish. If the flow is turbulent, too fast, too slow, or poorly directed, surface defects may appear.
Poor gate design can cause flow marks, cold shuts, air entrapment, surface porosity, and visible weld lines. The gate should be placed so that molten metal fills the cavity evenly and pushes air toward vents and overflows.
| Gate Design Problem | Surface Quality Issue |
| Gate too small | High-speed jetting, turbulence, flow marks |
| Gate too large | Poor pressure control, rough surface |
| Wrong gate location | Cold shuts, weld lines, trapped air |
| Long flow path | Early cooling, poor filling |
| Poor runner balance | Uneven filling in multi-cavity molds |
Die casting simulation can help predict metal flow, air entrapment, temperature distribution, and potential surface defects before mold production. This can reduce trial-and-error and lower tooling modification costs.
Manage Metal Temperature
For surface finish, metal temperature is among the most crucial process parameters. If the molten metal is too cold, it may not flow smoothly into thin sections and details. This can cause cold shuts, poor filling, rough texture, and visible flow lines.
If the molten metal is too hot, it may increase gas absorption, oxidation, die soldering, shrinkage, and die wear. Excessive temperature can also reduce mold life and increase surface defects.
The correct metal temperature depends on:
- Alloy type
- Part wall thickness
- Mold design
- Gate and runner system
- Required surface quality
- Production speed
A stable and controlled temperature window is more important than simply using a higher temperature. Manufacturers should monitor furnace temperature, holding temperature, and shot temperature to keep the process consistent.
Maintain Proper Die Temperature
Die temperature also affects surface finish. Should the die be too cold, the molten metal might solidify before the cavity is completely filled. This may lead to flow marks, cold shuts, incomplete filling, and rough surfaces.
If the die is too hot, the casting may stick to the mold, create soldering marks, increase cycle time, and cause surface roughness. Uneven die temperature can also lead to inconsistent surface quality between different areas of the same part.
Die Temperature Control Methods
- Use die temperature controllers
- Design proper cooling channels
- Balance spray cooling
- Monitor hot spots with infrared tools
- Avoid excessive release agent cooling
- Preheat the die before production
- Maintain stable cycle time
Good die temperature control helps achieve repeatable surface finish and reduces rejection rates.
Enhance the speed and pressure of the injection
It is crucial to properly regulate the injection’s pressure and pace. If injection speed is too slow, the metal may cool before the cavity is fully filled, causing cold shuts and flow marks. If injection speed is too fast, the flow may become turbulent and trap air, leading to surface porosity and rough texture.
Pressure is also important. Proper pressure helps the molten metal fill fine details and compact the casting during solidification. Insufficient pressure may cause poor surface definition, shrinkage, and porosity. Excessive pressure may cause flash, die wear, and surface defects.
| Parameter | Too Low | Too High |
| Injection speed | Cold shuts, poor filling, dull surface | Turbulence, gas porosity, flow marks |
| Injection pressure | Poor detail, shrinkage, weak density | Flash, die wear, rough surface |
| Intensification pressure | Internal porosity, poor compactness | Mold stress, flashing |
| Fill time | Incomplete filling if too long | Air entrapment if too short |
The best process setting should be developed through testing, machine data, and defect analysis. Modern die casting machines can track speed curves and pressure curves to improve process stability.
Improve Venting and Overflow Design
Air inside the mold cavity must escape as molten metal enters. If air is trapped, it can cause gas porosity, blisters, surface pinholes, and rough areas. Good venting is essential for both internal quality and surface finish.
Overflow wells help collect cold metal, oxides, and trapped air at the end of the filling path. Without proper overflow design, these defects may remain on the product surface.
Venting Improvement Checklist
- Add vents at the end of the metal flow path
- Keep vents clean and unblocked
- Use overflow wells to collect impurities
- Place vents in air-trap areas
- Consider vacuum die casting for high-quality parts
- Maintain parting lines to prevent vent blockage
- Avoid excessive release agent near vents
For high-performance or decorative parts, vacuum-assisted die casting can significantly improve surface quality by reducing trapped air.
Use the Correct Release Agent
Release agents help the casting separate from the die, reduce mold wear, and control die temperature. However, poor use of release agent can damage surface finish.
Too much release agent can create gas, stains, cold areas, and surface porosity. Too little release agent can cause sticking, soldering, and surface tearing. Uneven spraying can create inconsistent surface quality.
Best Practices for Release Agent Use
- Use the correct release agent for the alloy
- Control spray amount and spray time
- Ensure even spray coverage
- Allow enough drying time
- Avoid excessive cooling from water-based spray
- Use automatic spraying for consistency
- Clean residue buildup regularly
Release agent control is often overlooked, but it has a strong effect on surface appearance and defect rate.
Reduce Porosity Before Finishing
Surface finishing cannot completely hide porosity. In fact, machining, polishing, plating, or anodizing may expose porosity that was not visible after casting. Therefore, porosity must be controlled before the finishing stage.
Porosity can cause pinholes after polishing, bubbles after plating, leakage after machining, and poor coating adhesion. To reduce porosity, manufacturers should improve venting, reduce turbulence, control gas sources, and use proper pressure.
| Porosity Source | Surface Finish Problem |
| Trapped air | Pinholes and blisters |
| Shrinkage | Depressions and rough areas |
| Moisture | Gas bubbles and surface holes |
| Contaminated metal | Inclusions and rough surface |
| Poor venting | Surface porosity and flow defects |
For pressure-tight or decorative parts, X-ray inspection, pressure testing, and process monitoring may be required.
Improve Trimming, Deburring, and Handling
Even if the casting surface is good, poor post-casting handling can create scratches, dents, edge damage, and surface contamination. Trimming, deburring, shot blasting, machining, and transportation should be controlled carefully.
Handling and Post-Processing Tips
- Use proper trimming dies
- Avoid rough manual deburring
- Protect cosmetic surfaces during handling
- Separate parts to prevent collision
- Use soft trays or custom packaging
- Clean parts before coating or plating
- Control shot blasting intensity
- Avoid over-polishing thin features
For cosmetic parts, surface protection should begin immediately after ejection from the die.
Choose the Right Surface Finishing Method
Different finishing methods can improve surface appearance, corrosion resistance, wear resistance, or coating adhesion. The right method depends on material, application, and customer requirements.
| Finishing Method | Purpose | Suitable Parts |
| Polishing | Improve smoothness and appearance | Decorative parts, visible surfaces |
| Shot blasting | Remove burrs and create uniform texture | Industrial parts, pre-coating parts |
| Vibratory finishing | Smooth edges and remove small burrs | Small and medium components |
| Powder coating | Improve appearance and corrosion resistance | Housings, brackets, outdoor parts |
| Painting | Provide color and protection | Automotive and consumer parts |
| Plating | Improve appearance, conductivity, or wear resistance | Zinc die castings, hardware |
| Anodizing | Improve corrosion resistance and appearance | Aluminum parts, but requires good casting quality |
| CNC machining | Improve precision surfaces | Functional sealing or assembly areas |
The casting process should be designed according to the final finishing method. For example, parts that need plating require better porosity control than parts that only need shot blasting.
Set Clear Surface Quality Standards
Surface finish should not be judged only by opinion. Buyers and suppliers should agree on surface quality standards before mass production. This helps avoid disputes and reduces rejection rates.
Important standards may include:
- Surface roughness requirement
- Visual inspection distance
- Acceptable defect size
- Areas with cosmetic requirements
- Areas allowed for minor defects
- Coating or plating standard
- Color and gloss requirement
- Machining surface requirement
- Packaging and handling requirements
A useful method is to divide the part into different zones. For example, Zone A may be the visible cosmetic surface, Zone B may be a semi-visible area, and Zone C may be a hidden functional area. Each zone can have different acceptance criteria.
Surface Finish Troubleshooting Table
| Problem | Possible Cause | Solution |
| Flow marks | Low temperature, poor flow, poor gate design | Increase metal/die temperature, optimize gate |
| Cold shuts | Metal cools too early | Improve fill speed, temperature, and venting |
| Pinholes | Gas porosity, poor venting | Improve venting, reduce spray, use vacuum |
| Rough surface | Mold wear, contamination, and poor temperature control | Polish mold, clean metal, stabilize temperature |
| Soldering marks | Die too hot, poor release agent | Improve cooling, change release agent |
| Blisters | Gas trapped under the surface | Reduce moisture, improve venting, control heat treatment |
| Flash | Excess pressure, die wear, and poor clamping | Adjust pressure, repair die, check clamping |
| Scratches | Poor handling or ejection | Improve ejection design and packaging |
Improving die casting surface finish requires full process control, not just polishing. It starts with the right alloy, part design, mold quality, gate and runner design, metal temperature, die temperature, injection settings, venting, and post-processing.
Buyers should clearly specify cosmetic areas, roughness, coating or plating needs, machining zones, and inspection standards before production. Manufacturers need stable process control and regular mold maintenance.
A reliable die casting supplier can prevent surface defects, reduce porosity, control finishing quality, and deliver parts that meet both functional and appearance requirements.